


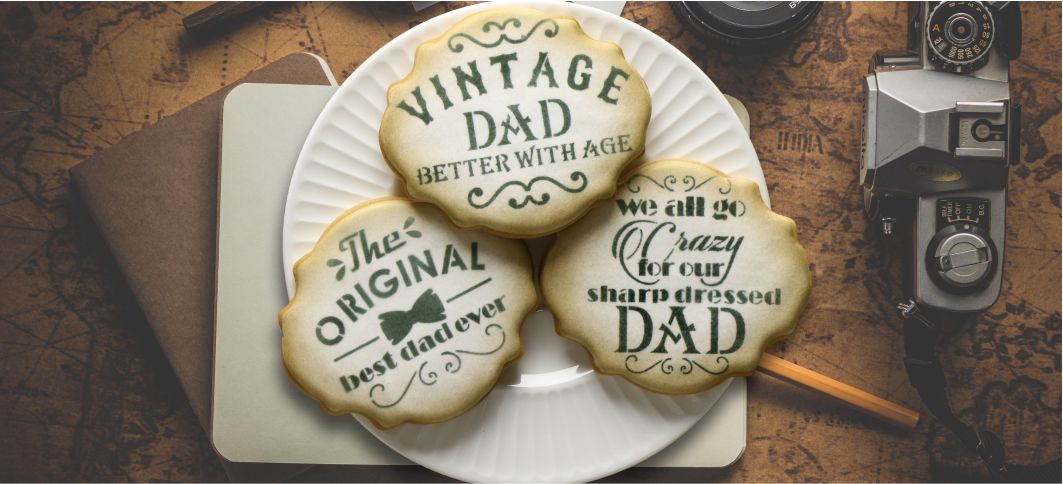
Show your dad he's a class act with these Vintage Style Father's Day Cookie Stencils! We give these cookies an antique look by shading around the cookie perimeter with a golden brown color. Then we airbrush on the messages!
Don't want to airbrush? You could apply the stencils with black royal icing and then spray luster dust to "antique" the edges!
First, let's pull some things together...

Here's what you'll need:
Sugar Cookies:
- Use our Sugar Cookie Recipe and cut them out with our 4" Barnes Plaque Cookie Cutter.
- You'll need to flood the cookies with white royal icing (if you need tips on flood consistency check out our Icing Consistency Tips ) and let the icing completely dry.
Stencils:
Airbrushing Tools:
- AirGenie Airbrush System
- Gyro-Cut Craft and Hobby Cutting Tool
- Cookie Magnets
- Plastic Bottle with Dropper Tip
- Stencil Genie
- Screen Genie
- DecoPac Airbrush Food Coloring
Masking Tools:
- Quadrant Masking Tool (x2)
- Glad Press'n Seal
Other Helpful Tools:
- Paper Towels
- Notta Cookie Reusable practice cookie (helpful if you are a beginner)
Let's Get Started:
The first step, of course, is to bake and ice your cookies. Let them cool, then flood with icing and let that dry.
1. Mixing the colors for the shaded border:
- mix Gold Shimmer and Harvest Brown - in roughly equal parts, mix them in a dropper bottle, which comes with a dropper tip.
- Once mixed, shake the bottle and pour 4-5 drops into the reservoir of the AirGenie airbrush tool.
- Test out the color on a spare cookie or white sheet of paper.
- Add more Gold or Brown as needed until you achieve the desired shade.


2. Airbrushing the Shaded Borders:
- Always test out the airflow on a stack of paper towels prior to adding each color.
- Lightly spray the edge of the cookie, using a slight sweeping motion and rotating it as you move to achieve even coverage all around. Test on the Notta Cook if you want to practice prior to apply it to the cookie.
- Once finished, place the cookies aside.


3. Cleaning the airbrush tool for the next color:
- Rinse out the reservoir three to four times with clean water.
- Next, reattach the hose, fill the reservoir, and run water through the tool until empty.
- Repeat once more with water and then again, this time using an inexpensive 100 proof vodka.


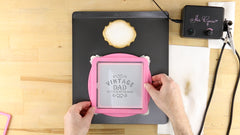
4. Preparing to Stencil:
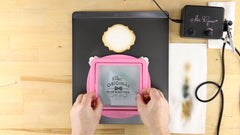
- Separate the two portions of you Stencil Genie and place the thicker side down, magnets facing up. Next, place the stencil over the top with design centered in the middle of the square.
- Next, place the Screen Genie over the top and lock everything into place using the remaining piece of the Stencil Genie.
- Place the entire assembly over the cookie, lining up the design where you'll want the color to go.


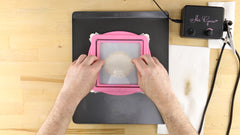
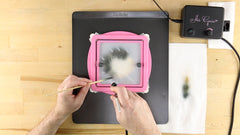
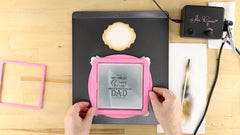
5. Airbrushing the messages:
- To help keep the stencil flat against the cookie surface, use stacks of cookie magnets, in three or four, and place them strategically where they do the most good.
- Next, carefully shake your bottle of DecoPac Airbrush Food Coloring in Midnight Black and pour 5-6 drops into the reservoir of your AirGenie Airbrush System airbrush tool.
- Prior to airbrushing each color and cookie, always test out the spray on a stack of paper towels. Adjust the flow as needed by turning the knob on top of the unit.
- Apply the color using light, even coats. Use a long needle or chopstick to further press down the edges of the stencil as you go.
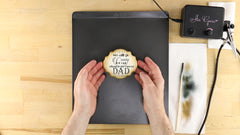
- Once finished, lift away the magnets and then the Genie tool assembly
- Set the cookie aside so that the colorant can dry.


6. Cleaning


- To clean the stencils and stencil tools in between cookies, rinse them off and dry completely using either clean paper towels or a lint-free dish towel.
- To clean the Screen Genie between cookies, take a fresh paper towel and wipe both sides of the mesh.
- DO NOT HEAT THE STENCIL OR THE GENIE TOOL! DO NOT SUBMERGE THE GENIE IN WATER!


7. Repeat the process for the next cookie using the second stencil.

8. Lastly, airbrush the third stencil design onto the third cookie.
- Your Vintage Style Father's Day cookies are now complete and ready to demonstrate that a child's love never goes out of style!
