


Take your teenager's taste buds for a ride 🚗 with this Caution New Driver Sixteenth Birthday Cookie Stencil Set from Confection Couture!
Watch out on the road! Fun birthday cookie stencil set for those turning sweet sixteen, newly licensed and hitting the road! Works great with the accompanying cookie cutters!
Here's what you'll need:
- Caution New Driver Sixteenth Birthday Cookie Stencil Set includes 2 Stencils and three cookie cutters!
- AirGenie Airbrush System
- Cookie Magnets
- Cookie Stencil Scraper
- Stencil Genie
- Screen Genie
- DecoPac Airbrush Food Coloring in the following colors:
- Honey
- Silver Shimmer
- Emerald
- Midnight Black
- Royal Icing ingredients
- Paper Towels
The first step is to bake and ice all of the cookies using our favorite sugar cookie recipe and the matching cookie cutters.


For the background of the Speed Limit 16 cookie:
- Load DecoPac Silver Shimmer airbrush food color in your AirGenie airbrush tool and test out the airflow on a paper towel.
- Adjust as needed using the knob on top of the unit.
- Now you can airbrush the entire cookie using small circular motions and numerous light coats.
- Take care not to add so much colorant that the liquid begins to collect into droplets. Once finished, place this cookie aside to dry.


Repeat the above steps using Emerald colorant to airbrush the background of the Sweet Sixteen St cookie.


Finally, airbrush the background of the Caution New Driver cookie using Honey colorant.


Next:
- Load some Midnight Black into the airbrush tool.
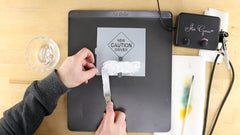
- Take your Stencil Genie and separate the top and bottom portions, placing the thicker piece down - magnets facing up. Position the Speed Limit design in the center of the square.
- Now, place your Screen Genie over the top of the stencil and lock everything together using the remaining piece of the Stencil Genie.
- Place two cookie magnets on either side of the your cookie.
- Line up the stencil tool apparatus over the cookie where you'll want the design to go and place more cookie magnets on top the of the existing stacks to help secure the stencil in place.
Airbrush through the stencil using the technique described above. Once completed, carefully remove the apparatus. Your first cookie is now complete!


Next, center the Caution New Driver design in the Stencil Genie and repeat the above steps to complete your second cookie.


Airbrushing lighter colors (white) over darker colors (emerald) doesn't work so for this stencil design we decided to use white royal icing.
With your icing mixed and ready to go, place a couple of magnets above and below the cookies before positioning the stencil. Add more magnets to hold the stencil in place.
Next, gently add the icing over the top of the stencil design using a baking spatula. Once the entire design is filled in with icing, use a Cookie Stencil Scraper to scrape the icing over the stencil, leaving a even layer within the design. Carefully lift the stencil straight up and away to reveal the icing design.

Your cookies are now complete and ready to congratulate the birthday boy or girl as they hit the road!