Counting the days until Christmas has never been so sweet with this Christmas Advent Calendar Cookie Confection Collection from Confection Couture!
What can you I use to stencil cookies?
Whether it’s airbrushing or using royal icing, Confection Couture has everything you need to stencil the perfectly beautiful and whimsical cookie! This includes an incredible selection of stencil designs for all occasions, airbrush systems, colorants, and accessories.
What kind of icing do you use for cookie stencils?
Royal Icing works best for either coloring and creating the stencil itself or for creating a perfect surface onto which to airbrush your stenciled design.
Can you airbrush cookies?
It’s easy to create beautiful designs on cookies or cakes using our incredible selection of stencils and accessories!
What do you need to airbrush cookies?
Confection Couture has everything you need to create whimsical designs on your cookies or cakes for any occasion!
What is the easiest way to decorate cookies?
Using stencils, in conjunction with either airbrushing or royal icing, is a super easy way to create exciting themed cookies for any holiday or celebration or just for the fun of it!
Here's what you'll need:

- Christmas Advent Calendar Cookie Confection Collection
- 2" Square Cookie Cutter
- 2"x4.5" Rectangle Cookie Cutter
- AirGenie Airbrush System
- Gyro-Cut Craft and Hobby Cutting Tool
- Cookie Magnets
- Plastic Bottle with Dropper Tip
- Quadrant Masking Tool (x2)
- Isolation Tool
- Stencil Genie
- Screen Genie
- DecoPac Airbrush Food Coloring
- Midnight Black
- Super Red
- Emerald Green
- Silver Shimmer
- Harvest Brown
- Glad Press'n Seal
- Paper Towels
Preparing to Stencil


After baking 25 square and 1 rectangle cookies, load four or five drops of the Black airbrush food coloring into your AirGenie Airbrush System airbrush tool.


Next, separate the two halves of you Stencil Genie and place the thicker half on your work surface with the magnets facing up. Place the first stencil with "December" centered in the middle. Add two Quadrant Masking Tools on the top and bottom. These will protect the cookie edges from overspray.
Place the Screen Genie overtop of everything and then add the top half of the Stencil Genie to lock it all in place. Cookie magnets, split into two stacks of four each, help press the stencil flat against the cookie surface.
Always test the airbrush flow on a stack of paper towels prior to airbrushing each cookie. Adjust the airflow as needed by turning the knob on the top of the unit.
Add the color in light coats using small circular motions.


It's important to frequently wipe off excess colorant from all of the stencil tools, especially mesh of the Screen Genie. Too much colorant will cause droplets to form on the cookie or bleeding underneath the stencil.
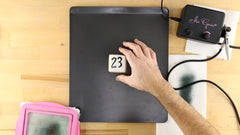
For the cookies with numbers, use the Quadrant Masking Tools to isolate each number on the stencil. Repeat the above airbrushing procedure for each numbered cookie.


Cleaning the Screen Genie


Every few cookies, you'll want to give your Screen Genie a more thorough cleaning. Either run it under a faucet or use a chemical-free spray bottle and spray water backwards through the mesh. Then dry completely using paper towels.


Continue stenciling the single-numbered cookies.


When necessary, clean the stencils and other tools by rinsing them with water and drying them completely.


For the double-number cookies, stencil each digit separately.


Continue with the other black stencil elements.


For more intricate designs, such as the eyes, mouth, and buttons on the gingerbread man, use Glad Press'n Seal to isolate small stencil elements.
Flatten out the plastic to remove and bubbles or wrinkles, then use the Gyro Cut craft and hobby cutting tool to cut around and peel away the desired shapes.
Now, mask and airbrush as described earlier.


Finish airbrushing the remaining black stencil elements.


Before switching to emerald green, swap out the airbrush tool (or clean the tool if you only have one - see instructions below).


Stencil the green border on all cookies that have one.


Don't forget to frequently wipe down your stencil tools.


Finish up the rest of the green borders.


Use the Press'n Seal to isolate any green stencil elements.


Once finished with green, clean your airbrush tools using the following technique.
Rinse out the reservior four or five times using clean water.
Next, reattach the hose and fill the reservoir with water, running it completely through the tool with the airflow turned all the way up.
Repeat this step, once again with water, and then a third time with an inexpensive 100-proof vodka.
Continue running air through the tool for a few seconds after the alcohol is gone.


Switch colorants and proceed with airbrushing all of the red stencil elements.


Next, load some honey colorant and complete all golden stencil elements.


For Santa's beard, try some silver shimmer food coloring.
Test it out on a sheet of white paper.
If you want the silver a bit more pronounced, try adding a drop of black to several drops of silver in an eye dropper bottle.


Finally, for the outer edge of the gingerbread man, load some harvest brown into your airbrush tool.

Your Christmas Advent Calendar Cookies are ready to bring joy into the hearts of your family and friends!


