The future will shine even more brightly with these Super Star Back to School Cookie Stencils from Confection Couture!
Accessories featured in this tutorial:

- Back to School Accent Cookie Stencil
- Back to School Basic Words Cookie Stencil
- Notebook Paper 2 Overlay Background Cookie Stencil
- 4" Hexagon cookie cutter
- 3" Circle cookie cutter
- 2" Circle cookie cutter
- AirGenie Airbrush System
- Gyro-Cut Craft and Hobby Cutting Tool
- Cookie Magnets
- Plastic Bottle with Dropper Tip
- Quadrant Masking Tool
- Stencil Genie
- Screen Genie
- Quadrant Masking Tool
- Isolation Tool for Cookie Stencils
- DecoPac Airbrush Food Coloring
- Super Red
- Honey
- Navy Blue
- Glad Press'n Seal
- Paper Towels
Stencil Genie


After you've baked or purchased your cookie, set up your AirGenie airbrush system, shake the bottle of Navy Blue food coloring, and load a few drops into the tool's reservoir.
Next, take the hexagon cookie and the lined paper stencil.


Grab the Stencil Genie and separate the bottom piece from the top piece. Place the bottom on the surface on which you'll be working.


Next, place the stencil towards the right of the Stencil Genie so that the vertical line will fit onto the cookie. Next, use the Quadrant Masking Tool to mask off the left edge of the stencil. Place the top of the Genie on top, locking everything in place using the built-in magnets.
Airbrushing


Prior to stenciling, always test the airflow on a stack of paper towels. Adjust the flow knob on the unit as necessary. Now, spray the color through the stencil onto the cookie. Keep the airbrush tool perpendicular to the cookie surface at all times and maintain at least a couple-inch distance away.
Apply the color in light, even coats.
Glad Press'n Seal and Gyro-Cut


For more intricate stencil designs, use Glad Press'n Seal to mask off smaller elements.
First, cut a piece of the Press'n Seal about the size of the stencil. Next, place it, sticky side down, onto the stencil and flatten it out, removing any bubbles or wrinkles.
Use the Gyro-Cut craft and hobby cutting tool to trim away any excess Press'n Seal. Next, cut around the desired element of the stencil, in this case just the words "Super Star". Hold the Gyro cutter like a pen, keeping the metal blade at a 90 degree angle to the stencil surface. Next, use the edge of the blade to lift on side of the trimmed plastic and use your fingers (or tweezers) to grasp it and peel the trimmed area away.
Screen Genie


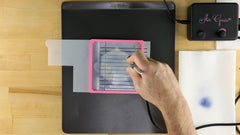
Now, place the Isolation Tool over the bottom of the Stencil Genie and place the stencil over the square opening. Take the assembled Screen Genie and place over the stencil.
The Screen Genie is amazing for preventing dreaded underspray!
Lastly, use the top of the Stencil Genie to lock everything together.


Airbrush as you did earlier. (Note: Since the Screen Genie collects a bit of the food coloring as air passes through it, you may need to increase the airflow slightly.)


Repeat this process for other cookies. As much as possible, work with one color at a time.


Continue on with the other blue stencil elements.
Cleaning the Screen Genie


After a few cookies, you will notice that your Screen Genie is becoming slightly clogged with color. Cleaning it is a snap, however. Disassemble the unit by pulling out the white, rubber gasket and removing the screen. Just as you would when cleaning a stencil, simply dunk the screen into a bowl of water for a few seconds. Next, remove and pat dry between two paper towels or lint free cloths. Next, take a hair dryer and gently blow dry the screen for a few seconds. Lastly, reassemble the unit and press the white gasket firmly into the pink frame with the screen in between.


Finish up with any blue stencil elements.


When it was time to switch the color from blue to red, we grabbed a spare airbrush tool and connected it to the AirGenie. If you don't have an extra tool, see below for instructions on how to clean it between colors.


Proceed with any red stencil elements.


Now stencil the "School" in "Back to School".


...and the letters in "ABC-123"


You're a "star" yourself!
Cleaning the AirGenie airbrush tool


To clean the airbrush tool, take a bowl of water and a couple of dropper bottles. Rinse out the airbrush tool reservoir three times with clean water. Next, fill the reservoir with water and run it through the tool at full power. Do this once more with water and once with grain alcohol or vodka. Continue running air through the tool for a couple of seconds after all of the vodka is gone.


The last color is honey.


Repeat the above steps for all remaining stencil elements.


Now, your cookies are finished and ready to surprise your favorite students!

Visit ConfectionCoutureStencils.com today for more information.


