“Yule” wish you were “gnome” for the holidays with Confection Couture’s Christmas Gnome Cookies!
What can you I use to stencil cookies?
Whether it’s airbrushing or using royal icing, Confection Couture has everything you need to stencil the perfectly beautiful and whimsical cookie! This includes an incredible selection of stencil designs for all occasions, airbrush systems, colorants, and accessories.
What kind of icing do you use for cookie stencils?
Royal Icing works best for either coloring and creating the stencil itself or for creating a perfect surface onto which to airbrush your stenciled design.
Can you airbrush cookies?
It’s easy to create beautiful designs on cookies or cakes using our incredible selection of stencils and accessories!
What do you need to airbrush cookies?
Confection Couture has everything you need to create whimsical designs on your cookies or cakes for any occasion!
What is the easiest way to decorate cookies?
Using stencils, in conjunction with either airbrushing or royal icing, is a super easy way to create exciting themed cookies for any holiday or celebration or just for the fun of it!
What you will need

- Christmas Gnome 3 Piece Cookie Stencil
- Snowflakes Accent Cookie Stencil
-
2"x4.5" Rectangle Shaped Cookie Cutter
- 3" Circle Shaped Cookie Cutter
- 2" Circle Shaped Cookie Cutter
- AirGenie Airbrush System
- Gyro-Cut Craft and Hobby Cutting Tool
- Cookie Magnets
- Plastic Bottle with Dropper Tip
- Quadrant Masking Tool
- Stencil Genie
- DecoPac Airbrush Food Coloring
- Super Red
- Emerald Green
- Petal Pink
- Harvest Brown
- Honey
- Black
- White
- Glad Press'n Seal
- Paper Towels
Mixing colors


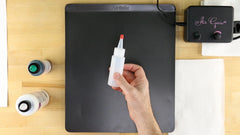
For this project, we mixed some colors to create a more muted green and red. To accomplish this, put a few drops of Emerald Green into your dropper bottle and then add roughly the same amount of white. Swirl together by moving the bottom of the bottle in a circular motion. Load the muted green into your AirGenie airbrush tool and test the new color on a white piece of paper. Add more green or white to achieve the desired shade of green for your cookies.
Grab a second airbrush tool and repeat the process with another dropper bottle by mixing Super Red with Harvest Brown. Text out the color until you have the perfect muted red. Place the green airbrush tool and dropper bottle aside and leave the airbrush tool with red color loaded and ready to go.
Stencil Genie and Quadrant Masking Tool


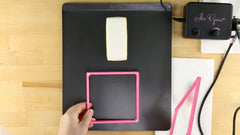
For the rectangle cookie, we'll start with the red hat and mittens. Remove the thinner half of your Stencil Genie and place the bottom on the table. Next, place the stencil over the bottom frame and use the Quadrant Masking Tool to mask off the unwanted portions of the stencil and to also protect areas of the cookie from overspray.
Test the airflow on a paper towel each time prior to airbrushing the actual cookie. Adjust the flow knob as needed. Apply the color lightly by moving the airbrush tool in a small, circular motion. Take care not to add too much color, as this can lead to the food coloring collecting together into droplets.
Once airbrushing is complete, take one side of the Stencil Genie assembly and carefully lift towards the opposite side to reveal the finished stencil element.
Glad Press'n Seal and the Gyro-Cut


For more intricate stencil designs, use Glad Press'n Seal for masking. Cut off an appropriately sized piece and place over the stencil. Next, flatten the film to remove any bubbles or wrinkles.
The Gyro-Cut craft and hobby cutting tool is perfect for trimming around individual stencil elements. Simply cut around and peal away the trimmed area to uncover the desired part of the design.
Next, load the the stencil into the Stencil Genie like before. You might still want protect areas of the cookie with the Quadrant Masking Tool.
Continue airbrushing.


Repeat the above steps to add some snowflake accents to your cookies.
Cleaning the airbrush tool


Prior to switching colors, be sure to clean the airbrush tool thoroughly. This can be achieved by rinsing out the reservoir with fresh water. Next, run clean water through the tool with the dial turned all the way up. Repeat this step, again with fresh water, and then a third time with an inexpensive 100-proof vodka. After the reservoir is empty, continue running air through the tool for a couple of seconds to remove any residual liquid.
Load the next color - in this case, the muted green you created earlier.


Your guests are sure to love these whimsical holiday cookies!
For more information, visit ConfectionCoutureStencils.com today.


