


You'll send thrills up their spines when you bring out these Wishing You a Haunted Night Cookies from Confection Couture.
Here's what you'll need:
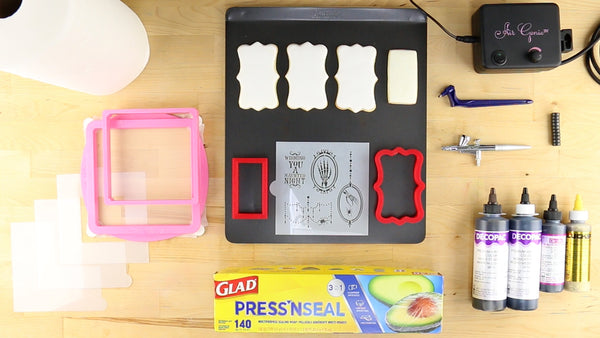
- Wishing You A Haunted Night Cookie Stencil
- 1.5" x 3" Rectangle Cookie Cutter
- 4" Prescot Plaque Cutter
- AirGenie Airbrush System
- Gyro-Cut Craft and Hobby Cutting Tool
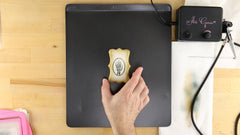
- Cookie Magnets
- Plastic Bottle with Dropper Tip
- Quadrant Masking Tool
- Stencil Genie
- Screen Genie
- Isolation Tool for Cookie Stencils
- DecoPac Airbrush Food Coloring
- Midnight Black
- Stone Gray
- Harvest Brown
- Gold Shimmer
- Glad Press'n Seal
- Paper Towels
Mixing colorants


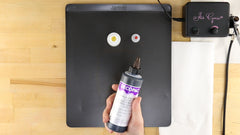


DecoPac Airbrush Food Coloring is perfect for projects like this. For the shaded border, mix Gold Shimmer and Harvest Brown - in roughly equal parts. You can mix them in a dropper bottle, which comes with a dropper tip. Once mixed, shake the bottle and pour 4-5 drops into the reservoir of the AirGenie airbrush tool. Test out the color on a spare cookie or white sheet of paper. Add more Gold or Brown as needed until you achieve the desired shade.
Airbrushing the shaded borders


Now it's time to airbrush your borders. Always test out the airflow on a stack of paper towels prior to adding each color. Spray the bottom and right side, rotate the cookie 180°, then repeat for the top and left. Once finished, place the cookies aside.
Cleaning the airbrush tool


To clean the airbrush tool between colors, rinse out the reservoir three to four times with clean water. Next, reattach the hose, fill the reservoir, and run water through the tool until empty. Repeat once more with water and then again, this time using an inexpensive 100 proof vodka.
Masking the individual stencil elements


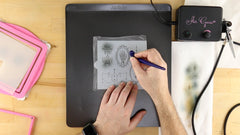
Now it's time for the stencil! Cut a piece of Glad Press'n Seal and place over the stencil. Flatten out any bubbles or wrinkles. Use the Gyro Cut craft and hobby cutting tool cut around the "Wishing you a haunted night" text, but not the accents above and below. Turn the Gyro cutter blade sideways and gently pry up one corner of the trimmed plastic. Peel the cut portion away to reveal the text underneath.
Stencil Genie
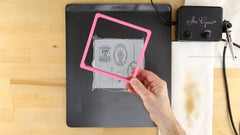


Next, separate the two halves of the Stencil Genie and place the bottom (thicker piece) down with the magnets facing up. Place the stencil on top with the current design centered within the square.
Isolation Tool

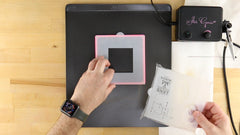

Use the Isolation Tool to mask off the areas of the cookie surrounding the stencil and to protect it from overspray.
Screen Genie


Lastly, place the Screen Genie over the top and lock into place using the top (thinner) portion of the Stencil Genie.
Airbrushing the inner designs


Place the apparatus aside and load the airbrush tool with 4-5 drops of Midnight Black airbrush coloring. Place the assembled stencil apparatus over the cookie, ensuring that the design is centered. Add two stacks of cookie magnets (four each) to help press the stencil flat against the cookie surface.
After testing the airflow on the paper towel, spray the color through the stencil using small, circular motions. Once you're satisfied with the amount of color, simply lift the stencil apparatus to reveal your first design!


Repeat the above process with Glad Press'n Seal, trimming around the the bony hand and inner circle, but leaving the outer, beaded trim. Airbrush as you did previously.


Proceed with the 'bony hand holding the spider' design.


Next, remove the plastic from the stencil. Use the Quadrant Masking Tools to isolate the 'spider and beads' design. Add this to the Stencil Genie / Screen Genie assembly. Airbrush as before.
Cleaning the stencil and masking tools


To clean the stencils and masking tools, simply dip them in a bowl of water for a few seconds. Then pat dry with clean paper towels or a lint free rag.
Cleaning the Screen Genie


When coloring starts to bead up on the screen, it's time to clean your Screen Genie. This can be accomplished by flipping it over and spraying water through it using a spray bottle. Next, dry the Genie thoroughly with paper towels. Make sure it's completely dry. Even a tiny drop of water could spell disaster for the next cookie being airbrushed. If necessary, use a hair dryer to complete the drying process.
Applying the Outer Trim


Now, it's time for Stone Gray. Repeat the above masking and trimming, only this time isolating the outer trim of each cookie. Continue airbrushing.


Proceed with the trim on the bony hand design.


Repeat for the 'bony hand holding spider' design.
Your 'Wishing You a Haunted Night' cookies are complete!
